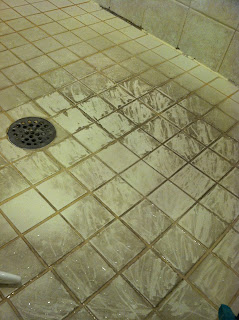
So...here it is. This, my friends, is what four years of cleaning your shower only once a month gets you. A whole lot of dirt! The only mystery about this picture is the solitary clean tile near the front of the shower. How did that tile stay clean this whole time? Does it have a secret I don't know? One that could have saved hours of my life?
First things first, since they didn't have doggy respirators at the store, I locked the pooch out of the bathroom. She seems so distressed in the picture, but I can assure you within three seconds she was snoring under the bed again. As a matter of fact, I didn't see her again until she heard me making myself a snack hours later.
Next, I got geared up. I am not usually one for selfies, but this situation seemed to necessitate one. I can't decide if I have a tiny head or if all safety equipment is sold for giants...what do you think? The good news is my neck was covered in case I accidentally started breathing through a trach!
Through all of my research last night, I found out that I should absolutely bleach the entire shower before doing anything else. Apparently, if you don't kill the mildew first it will just come right back. Go figure! I'll leave out the ridiculously boring details of how to use bleach, but I did find that scraping the dirt worked the best of all for removal. Maybe it was loosened by the bleach?
 |
| Note the huge glove as well...it's official! All safety equipment is, indeed, sold for giants! |
It was about this time that I realized I was putting way too much muscle in to this activity. After all, I had gotten "no scrubbing necessary" tile cleaner made with multiple forms of acid. Just spray, leave 2-3 minutes, and wipe off with a sponge before rinsing. Great!!! What have I been waiting for?
Don't waste your money! The results of this so-called "cleaner" were so negligible I even forgot to take a picture of the product. Wah, wah, wahhhhhhh. How the heck can I get this thing clean?!? Well, scraping seemed to work the best in the beginning...I realized I just needed a "scraper" to help me out. Cue me ripping open the package of the caulk removal tool; this things sole purpose in life is to scrape! So what if this isn't technically caulk? Within 10 minutes, the shower looked like this.
Moral of the story is chemicals are useless. If something needs cleaning, just wipe the dirt off. You live, you learn!
Sadly, since this took me so long, I am going to have to do part two of the great shower restoration tomorrow. Stay tuned for this cupcake's chronicle of caulking a shower...


Lol that safety equipment is huge!! Too bad they didn't have a doggy respirator =)
ReplyDeleteI'm glad you were safe and wearing the right stuff. At least you didn't spend 2 days half-dying like I did after I cleaned our shower, haha :)
ReplyDelete